Quick Start Guide for Track-It™ Data Loggers
This Quick Start Guide provides simple, step-by-step instructions to help you set up and begin using most Track-It™ Data Loggers quickly.
The guide applies to the following Track-It™ Data Logger models:
- Temperature (including USB, Rugged, and Extreme)
- RHTemp
- Barometric
- Pressure/Temperature
- Pressure/Vacuum
- DC Voltage and Current
- AC Event
Note: This guide does not apply to RFID Track-It™ Data Loggers.
Let’s begin…
1. Install USB Driver and Track-It™ Software
IMPORTANT! Do NOT plug the Track-It™ Data Logger into the USB port until AFTER the USB Driver and Track-It™ DataLogger Software have been installed.
Download Track-It™ DataLogger Software: https://monarchinstrument.com/software-downloads/#track-it
Unzip the downloaded file to a local directory on your PC.

Double click CD_Start.exe. This will launch the Track-It Data Logger’s splash screen (right).
- Click Install USB Driver and follow the prompts. Accept any security messages to continue installation.
- Click Install Software and follow the instructions to complete the installation. The software is now installed and ready to use.
- Logger and software manuals may also be accessed here.
Note: If you have trouble downloading or installing, refer to our guide, How To Install Track-It™ Driver and Software.
2. Install Data Logger Battery (if necessary)

Most Track-It™ loggers have the battery preinstalled. For the Rugged Temperature Logger, install the battery that was supplied with your Track-It™ Data Logger. Refer to the diagram below for installation.
Remove threaded end cap with coin or screwdriver and insert battery as shown. To replace the battery in any Track-It™ Data Logger, refer to the product’s Instruction Manual.
To replace the battery in any Track-It™ Data Logger, refer to the product’s Instruction Manual.
3. Connect Data Logger and Track-It™ Software
Plug the Track-It Logger into an available USB port on the PC. Some models plug directly into the USB port; others connect to the USB port with a cable (supplied). If the Found New Hardware Wizard appears, follow the prompts to complete the installation.
Start the Track-It DataLogger™ Software by double clicking the Track-It™ icon (shown at right) on your PC or from the Start menu.
4. Connect Your Data Logger
If the USB driver installed properly, you will see Device Connected displayed in the lower right-hand corner of the
Track-It™ Software window.

You can now begin using Track-It Software to configure your data logger and/or view recorded data.
Track-It™ Software will list all Track-It Data Loggers connected to your PC. To view the list and switch between loggers, click on Devices then Device List.

5. Configure and Start Logging Data
Select the Device Setup tab as shown. The software will automatically retrieve and display the data logger configuration.
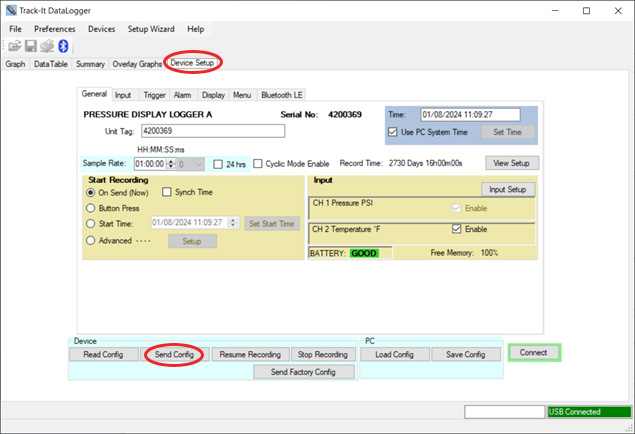
Review default factory configuration settings and make any necessary changes – sample rates, triggers, alarms, etc. Be sure that the time and date is set properly.
Click the Send Config button under the Device Configuration section of the window. Your data logger is now operational!